CUTICLE OIL
1 teaspoon sweet almond oil
1 Vitamin E capsule (contents of)
2 drops essential oil (Rosewood is good for nail strength, Tea Tree is good for any fungal conditions)
Thursday, December 31, 2009
Tuesday, December 29, 2009
candle jar recipes

Candle Jar Recipes
www.longcaneprimitives.com
longcaneprimitives@yahoo.com
Thank you very much for buying these recipes and instructions from me! If you need any help or have any questions, please email me and I will be glad to help you. I do work “7 nights on 7 nights off” at our hospital and on my weeks on sleep during the day but if you contact me on my week “on”, I will get back with you as soon as I get up. ☺
These Jar Candles are not hard at all. They are some of my favorite to make being that I like to recycle things and this is a great way to use old jars that we might be inclined to throw away. I use heavy glass pickle and jelly jars mostly when making these Candles. I’ve found the Mayonnaise Jars are really not thick enough and I’m always a little leery of the glass breaking from the flame of a wick.
I’ve provided all of my supplier information below with the links included. I really strongly encourage you to use a good wax when making Candles. I’ve found the waxes that are available at “Hobby” Stores are really greasy and I do not like it. (This is up to you though!) ☺
All of my Jar Candles are made using Soy Waxes. Soy is renewable (burns down to nothing); releases no harmful toxins into our air and is made from Soybeans grown by our American Farmers therefore promoting our own economy and most importantly, our farmers! Soy is capable of holding more fragrance oil than paraffin wax which makes for a stronger smelling candle!
In this recipe, I’m going to walk you through step by step on how to make these Jar Candles using Soy but you are welcome to make them out of Paraffin also. Again, this is your decision! ☺
Thank you again for buying from me and have a blessed day!
Terri Browning
3763 Lee Road 390
Opelika, Alabama 36804
Needful Supplies
Soy Wax
I get all of my Soy Wax from either www.cajuncandles.com or www.candlewic.com
Depending on where you live and the UPS shipping from these companies, I would go with the cheaper one! ☺ They both sell fantastic waxes!
I used Soy in the above Jar Candle picture from Candlewic and the link for ordering is
http://www.candlewic.com/store/Product.aspx?q=cNatural+Waxes,p677
Remember on Waxes, the higher your melt point (the wax above is a 125 melt point) the harder the wax is. Just a FYI! ☺
Embeds
Embeds are the decorations added to candles such as nuts, fruits and so on. I make all of my own embeds and do sell them for $8 a pound and I’m always glad to combine shipping on them. The website page my embeds are on is
http://www.longcaneprimitives.com/catalog.php?category=21
If you would like to order them off the net, you can do a Google Search for “Candle Embeds” and there are lots of Companies out there that sell them!
In this recipe I used Chocolate Drop Embeds. You can do a search for the Chocolate Drops or Chocolate Bits to add to you candles if you would like to embellish it with them.
Wicks
I buy all of my wicks from Candlewic. If you would like to order the exact same wicks that I use, you will need to call them to place this order since mine are custom made. This is the information that you will need to give them.
Size #2, Clip 20 and I buy them in 6 inch lengths and cut them down to the size I need if they need to be smaller for my jars.
Their customer service phone # for ordering is
1 800 368 3352.
Again, the website is www.candlewic.com
You are welcome to use the wicks of your preference but I wanted to provide you with the information for the exact wick that I use. ☺
Dyes
I buy all of my Candle Dyes from www.cajuncandles.com. I do not like block dyes but what dye you use is again, up to you! ☺
The link for ordering the dyes I use is
http://secure.mycart.net/catalogs/catalog.asp?prodid=421403&showprevnext=1
I buy the Ivory for these Cookie Dough Candles and use just a tad in the wax for a gorgeous light tan color.
Note: When coloring your wax, always remember to start with just a little dye and add more as desired.
The easiest way to test the color of wax I’ve found is to drop just a little bit on a clean sheet of wax paper and the color the wax dries is the color your wax in your candle will be.
Warning labels
Always affix a Candle Warning Label to the bottom of your Jar Candles when giving them away or selling them. Warning labels are available very cheaply at either Cajun or Candlewic.
Melting Source
I melt my waxes in a Presto Kitchen Kettle that I bought from WalMart years ago. They are temperature controlled so they are very safe and they have a lid which is important when working with waxes.
Please never leave hot wax unattended around children or pets.
I melt my waxes on the low end of the warm setting.
Always be sure and follow wax manufacturers melting temperature settings.
Fragrance Oil
Buy the Fragrance Oil that coordinates with the embeds and color of the Candle that you are making.
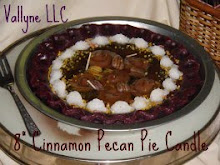
In the above picture of my Cookie Dough with Dark Chocolate Candle, I’ve used Cookie Dough Fragrance Oil that I bought from www.candlewic. The link for the oil that I use is
http://www.naturesgardencandles.com/candlemaking-soap-supplies/item/rf-32/-Chocolate-Chip-Cookies-Fragrance-Oil-(ZB).html
This oil smells rich and wonderful! ☺
Let’s make some Candles! ☺
I have my embeds ready before I start making my Candles so get them out so they will be ready to add to your Jar Candle.
Using your melting source, melt some soy wax in your pot. I usually melt about 2 cups (at least) at a time. This is like cooking; just gauge with your eyes the amount of wax to fill your jar.
When the wax is completely melted, turn off your heat source (The wax is clear in the pot). Add your dye now. I use a toothpick to dye my wax. Just dip the toothpick into the top of the bottle of dye and then dip into the melted wax. Stir with your measuring cup (be sure it’s metal and not plastic). When you have your desired color (a light tan for the Cookie Dough Candles), add your Fragrance Oil. Always follow the directions on the bottle for the oil to wax ratio but generally speaking, I use about 2 tablespoons for a 16 ounce Jar Candle.
Note: Do not over scent your Candle.
Candle Makers that are out there saying they are triple scenting their Candles are making very dangerous, combustible Candles. Wax and Fragrance Oil is combustible! I have “blown up” one Cake Candle that I made years ago and believe me☺, it is not a pretty site!
Soy has an amazing scent throw capability and when you use good oil, you are going to come out with a great smelling Candle!
Do not buy the cheaper Oils to make your Candles. By the time you add extra oil for a stronger scent throw, you are wasting money.
Some Candle Oil Manufacturers use other oils to dilute their Fragrance Oils and that is the reason they can sell them so cheaply. They are not worth it.
At this point I get one of my wicks and my metal measuring cup and place just a little bit of my melted wax into the bottom of my jar. When it starts to harden, stick the wick to the bottom of the jar. You are using the wax like glue. It will hold the wick to the bottom of the jar.
When you have your wax dyed and scented, it’s time to make those grubby layers for the Jar! To do this, just let the wax set in the pot until a thin layer
of film has formed over the top of the wax. When you see the thin layer formed, start whipping the wax with your metal measuring cup. Be sure and get the wax that is on the sides of the pot.
Whip until you have a consistency like mashed potatoes.
Using your measuring spoon, dip out some of your grubby wax and carefully place it in the jar. I hold my wick up straight with one hand while dipping wax with the other. You can push the wax down with your fingers if you would like. I usually do this to make the wax more like cookie dough smushed down into a jar.
When you have the jar about ½ way full, take some of your embeds and place them on top of that layer of wax being sure to get them to the outside of the jar so that they can be seen.
Mash them down just a tad into the wax so they will stay placed.
Get more wax in your measuring cup and place more grubby wax into the jar. When you have the jar full of wax about 1 inch from the top, top the jar with more of your embeds and push down slightly into the jar.
Position your wick in the center of the jar now. If it’s off a little to the side, just pull on it with your fingers until it’s in the center and then dap with your fingers any wax that got messed up doing that or add another embed there! ☺
As a general rule, I use 1 wick for my pickle and jelly jars. I do not use the small 8 ounce jars for my Jar Candles. I just do not feel really good about the size of my wicks and the size of the mouth of the jar but you can find a smaller burn diameter wick for smaller jars and make them.
If you call the candle company that you buy wicks from, they will be glad to tell you the burn diameter of their wicks. I have about a 2 inch burn diameter on my wicks which means that I get about 2 inches of warmed wax all the way around my wick which creates the scent throw of the wax. Whew! I hope that makes sense! ☺
When cleaning up your melting pot, melt your wax again and if you have any left, pour it into an old metal muffin pan or something like that. Never use any cooking implement again for food that you have used with wax.
After this wax has cooled and hardened in the muffin pan, I put the little block of wax in a plastic storage bag to keep it clean. It will just fall out of the pan!
When you are ready to use that wax again, you will have it!
If you do not have enough wax left to fool with, after the wax has heated just clean the pot out with a paper towel. Do not use water to clean this pot! And never pour melted wax down your Cooking Room Sink!
Just wipe with paper towels until the towels show no wax on them! ☺
You have made your jar!!! Isn’t it gorgeous? ☺
I hope you enjoy making these Jar Candles! They are fantastic as handcrafted gifts and also are great Craft Show Sellers!
Please email me if you have any questions! I love helping people learn how to make the “hand did’ offerings that I do and will be more than glad to help you in any way that I can.
Please remember that you are welcome to buy your supplies for which ever company you would like. I just wanted to provide you with the exact information that I use in making my Jar Candles.
A cute packaging idea for your Jar is to attach a grubby hangtag to the wick! Just buy some jute string (available in the Craft Department of WalMart over in the jewelry making part) and cut about a 6 inch length of it. Tie it onto your wick!
Please always remember to tell folks to keep their wicks trimmed to ¼ inch!
To curl your wick, just wrap starting from the end with a pencil and then when completely wrapped, pull out the pencil and you have a curled wick! Pretty and Prim!
Below I’ve provided a couple of my Jar Candle recipes that I think are the prettiest! Please feel free to make them!
Just as a little extra information, you can make Chocolate Drops by adding just a touch of paraffin wax to some melted soy, then heavily color it in the Ivory Dye making the wax deep chocolate color and then letting it harden in the pot just a little. When it’s a little hard but still pliable enough to work with, get a tad in your hands and roll into Chocolate Drops! ☺
When adding fake Sugar to some of my Jar Candles (like the Cookie Dough Candle in the picture), I sprinkle with Dazzle Dust. The link for ordering is
http://www.rusticescentuals.com/dazzledust.html
I’ve also included a Christmas grubby hangtag for you to use on your Candles if you would like! Print if off on some card stock paper and cut them out to use on your Jar Candles!
Thank you again and have a blessed day! Terri
www.longcaneprimitives.com
Blueberry Crisp Jar Candles
Blueberry Embeds
Brown Sugar Wax Bakery Style Crumbs
Blueberry Candle Fragrance Oil
Ivory Candle dye for light tan colored wax
Strawberry Pie Jar Candle
Strawberry Embeds
Strawberry Pie Fragrance Oil
Ivory Candle dye for light tan colored wax
Banana Cream Pie Jar Candle
Banana Round Embeds
Banana Pudding Fragrance Oil
NO DYE FOR THIS CANDLE
Chocolate Raspberry Crème Roll Jar Candle
2 layers for this candle
Bottom layer:
Chocolate Raspberry Crème Fragrance Oil
Lots of Ivory Dye for Dark Chocolate bottom layer of whipped wax
Raspberry Embeds
Top layer
Chocolate Raspberry Crème Fragrance Oil
NO DYE FOR A WHITE TOPPING ON THE JAR CANDLE
Raspberry Embeds
Cookie Dough Jar Candle
Friday, December 4, 2009
Candle safety tips

We take great measures to make the best and safest candle possible. Before burning our candle, familiarize yourself with the safety warning attached.
Always keep a burning candle within sight.
Never burn a candle on or near anything that can catch fire. Burn candles inside a one-foot circle of safety, an area free of anything that could come in contact with the flame and burn.
Keep out of reach of children and pets.
Always burn a candle in a moisture-free environment. Presence of water vapor or water spill in a candle can result in a huge flame. Water-oil (or water-wax) mixture can vehemently bubble and sizzle causing candle content thrown out. This can result in severe personal injury and/or broken glass.
Teach everyone in the family the rules of safe candle use.
Use only indoors, away from drafts, vents and air currents in a well-ventilated room. Do not burn on cold, wet or unstable surface. Always use an appropriate heat-resistant surface. Do not move while lit, or until gel/wax hardens. Trim wicks to 1/4 inch prior to each use. Keep the wax pool free of wick trimmings, matches and debris at all times. Place lighted candles at least 3 inches from one another.
Stop use when ½ inch of gel/wax remains. Extinguish immediately if the candle flickers repeatedly, or the flame becomes too high or if wick or flame comes in contact with objects or an abnormal flame occurs.
Store in cool & dry place. Do not keep the candles near heat. Avoid direct sunlight. Never touch or move a votive or container candle when the wax is liquid.
Sunday, November 15, 2009
Apple pie Candle with three wicks, our most popular candle!
http://soycandlemart.com/5quot-apple-pie-candle-with-three-wick5.html

This is our most popular pie candle, take a look!

Saturday, November 14, 2009
Thanksgiving holidays

We are planning on going to my inlaws for a turkey dinner. That means no cooking, for me!
Wednesday, November 11, 2009
the link on how to make your own cake stand
http://armellejewelry.blogspot.com/2007/03/make-your-own-cake-stand.html
Here is the link in case you want to make your own cake stand. Tip: dont use super glue! It will leave permanent fingerprints on the glass. I use the stands at my craftshows to provide a neat view of our pies!
Here is the link in case you want to make your own cake stand. Tip: dont use super glue! It will leave permanent fingerprints on the glass. I use the stands at my craftshows to provide a neat view of our pies!
Monday, November 9, 2009
make your own snowglobe- fun with the kids
Everyone loves snow globes! You can easily buy these items wholesale and resell them on your own. However, if you are creative, make your own to sell! A snow globe is a beautiful showpiece, and always makes a great paperweight,especially during the Holidays. This is why selling snow globes this time of year can prove to be a rather successful and interesting business.
You can buy snow globes on a wholesale basis and resell them, however you have the choice of making snow globes on your own, if you have the creativity and the patience to do so. It is not that hard to make a snow globe. First, you will need a jelly jar or any little round jar. In fact, any thing that is transparent, clear, and clean will work fine.
Next, you have to create the falling snow, best done with crushed eggshells. Using eggshell from hard-boiled eggs works great. This is because you can remove the thin lining that exists beneath the eggshell. If this lining stays in the eggshell, you will soon have unwanted floaters in the snow globe! Mineral oil provides the best atmosphere for making the snow look like it is falling. This is because mineral oil is thick enough to create the effect of the snow falling slowly, while clear enough to see through it.
You can create your own snow scene or atmosphere by using small objects to be glued on the underside of the lid of the bottle. Choose the smallest objects. The smaller it is the better the effect. It's also best if you use costume jewelry parts or clock parts of old watches. You can create great human and animal shapes using plastic wires shaped as the respective figurines.
Once you have created the snow scene, use some glue to stick the snow scene on to the underside of the jar's lid, add the mineral oil and crushed eggshells and then screw the lid back on again. Invert the bottle, shake it, and you are ready to sell or gift a snow globe! Of course, the main ingredient for a snow globe is imagination. You should expect maximum sales in the month of Christmas. If you are willing to spend more, you can create better snow scenes, and sell the snow globes at better prices.


How to know Which wax to use
Selecting the ideal natural wax to use in your candles depends on several key factors.
For one, you need to determine what type of candles you are going to make. For example, the type of natural wax you would use for container candles is very different from the type of natural wax you would use for taper candles.
Next, you need to determine what the most important wax traits are to you. Is it important that the wax is easy to work with, requires very little to no additives, or offers a stellar scent throw? Ultimately, the decision comes down to personal preference.
The first and most common form of natural wax is soy wax. As the name implies, soy wax is made from soybeans, and is an all-natural vegetable wax. Soy wax, because of its composition, burns cleaner and cooler than paraffin wax. It contains fewer toxins and carcinogens than paraffin wax, but also tends to be a little bit more expensive.
Because soy wax is made from an agricultural product, many people like the fact that soy wax supports the agricultural economy versus the petroleum industry, of which paraffin is a byproduct.
Soy wax is most often used in container candles and votives, and very often requires the addition of additives to eliminate some esthetic concerns and to increase fragrance retention and scent throw. Although soy wax offers many environmental and health benefits, it can be tricky to work with.
Another natural wax to consider is beeswax. While beeswax is the longest burning of any candle wax available, it is also one of the most expensive. Beeswax is most commonly used to make taper candles, and while it can be used in other types of candle making, most people find it simply too expensive to use in most applications.
A common way that beeswax is often used is to blend it with other waxes. Because of the burn life of beeswax, many candle makers choose to experiment and develop a unique wax blend that includes beeswax, giving them the results they wish to achieve without significantly driving up costs.
There are other types of natural wax that you may encounter from time to time.
Two of these are palm wax and bayberry wax. Because of how they are derived, both of these waxes are considered to be vegetable waxes. Bayberry wax is derived from the berries of bayberry bushes. It is known as a very hard wax and has a natural bayberry scent. Palm wax is a wax derived from palm trees.
Both of these waxes are slightly more expensive than paraffin wax, and are most often used as additives or in blends with other types of waxes.
When considering using natural wax in your candles it is important to consider your personal preferences as well as your target market. If you feel strongly about supporting the agricultural industry and about offering a vegetable based product, then soy or other natural waxes may be a great option for you. If you plan to sell your candles at farmer’s markets or to natural food stores, than you probably want to choose a natural wax as opposed to a paraffin wax.
While natural waxes do tend to cost slightly more upfront, if you market your candles to the right clientele and plan to take the time to educate people about their benefits, then most consumers are also willing to pay a little more for your product. The choice all boils down to your sales goals, your buyers and your personal preferences.

At the Vallyne Candle Company we use our own special blend of wax which was created by a chemist candle maker. When Harmony candles retired, she gave me the special recipe for our candles.
Sunday, November 8, 2009
candle testing spreadsheet from french hill counrty
Copyright Dawn Hulslander-Shaffer French Hill Country 2008 All Rights Reserved
This Guide is Shareware- Pass It On To Your Friends
Frenchhillcountry.com
1
French Hill Country~
Candle and Soap Silicone
Molds
By Dawn Hulslander-Shaffer
Frenchhillcountry.com
Outoftheboxsampler.com
Thecandlebuzz.com
Copyright Dawn Hulslander-Shaffer French Hill Country 2008 All Rights Reserved
This Guide is Shareware- Pass It On To Your Friends
Frenchhillcountry.com
2
Candle Testing Spreadsheet
Wax: Date: Notes:
Scent & Company
Kind Of Wax
Wax Melting Point
Temperature Put Color
% Fragrance Oil
Temperature Add
Fragrance Oil
Wick Used
Additives & % used
Temperature Added The
Additives
Pour Temperature
Cold Throw
Hot Throw
Glass Adhesion
Tops Of The Candles
More Notes:
Copyright Dawn Hulslander-Shaffer French Hill Country 2008 All Rights Reserved
This Guide is Shareware- Pass It On To Your Friends
Frenchhillcountry.com
3
Glossary of Terms:
Glass Adhesion= the ability for wax to stick firmly to
the sides of the glass container.
When there is a variation in the way wax sticks to the
glass it creates a wet look. You are looking for wax
that sticks to the glass and does not pull away.
Tops of Candles- This term refers to primarily soy
waxes. The tops of the candles end up bumpy and
textured and frosted. Candle makers usually shoot for
smooth tops.
Cold Throw- The scent amount (strength) that is given
off when the candle is cold.
Hot Throw- The scent amount (strength) that is given
off when the wax melts.
Wax Melting Point- point in the heating and cooling
curve where the temperature change flattens out is the
approximate MP of the wax.
The manufacturer has a recommended melting point.
I would melt the wax according to their suggestions.
This Guide is Shareware- Pass It On To Your Friends
Frenchhillcountry.com
1
French Hill Country~
Candle and Soap Silicone
Molds
By Dawn Hulslander-Shaffer
Frenchhillcountry.com
Outoftheboxsampler.com
Thecandlebuzz.com
Copyright Dawn Hulslander-Shaffer French Hill Country 2008 All Rights Reserved
This Guide is Shareware- Pass It On To Your Friends
Frenchhillcountry.com
2
Candle Testing Spreadsheet
Wax: Date: Notes:
Scent & Company
Kind Of Wax
Wax Melting Point
Temperature Put Color
% Fragrance Oil
Temperature Add
Fragrance Oil
Wick Used
Additives & % used
Temperature Added The
Additives
Pour Temperature
Cold Throw
Hot Throw
Glass Adhesion
Tops Of The Candles
More Notes:
Copyright Dawn Hulslander-Shaffer French Hill Country 2008 All Rights Reserved
This Guide is Shareware- Pass It On To Your Friends
Frenchhillcountry.com
3
Glossary of Terms:
Glass Adhesion= the ability for wax to stick firmly to
the sides of the glass container.
When there is a variation in the way wax sticks to the
glass it creates a wet look. You are looking for wax
that sticks to the glass and does not pull away.
Tops of Candles- This term refers to primarily soy
waxes. The tops of the candles end up bumpy and
textured and frosted. Candle makers usually shoot for
smooth tops.
Cold Throw- The scent amount (strength) that is given
off when the candle is cold.
Hot Throw- The scent amount (strength) that is given
off when the wax melts.
Wax Melting Point- point in the heating and cooling
curve where the temperature change flattens out is the
approximate MP of the wax.
The manufacturer has a recommended melting point.
I would melt the wax according to their suggestions.
Monday, November 2, 2009

Saturday, October 31, 2009
Friday, October 23, 2009
plug generator

I have tried a lot of free plug gererators for my plugboard. This is the best one http://www.readybanner.com/generator.html it is called a banner gererator and is so easy to use. Give me a hollar if you need any help! vallyne1234@yahoo.com
Thursday, October 22, 2009

Tuesday, October 20, 2009
new molds
I am always looking for new ideas for my pie candles. So last night I made two silicone molds, when they are dry and unmolded, I will post a picture of them on this blog.
Wednesday, October 14, 2009
where we will be on friday
Dave and I will be working at the Grand Ledge store this saturday. Dont forget this saturday is Sweetest Day and we have many cool gifts for men and women. So, come on over and look at the new items. We recieve new items almost everyday! The store will be opened at 11 a.m. til 5 p.m. on SATURDAY.
Thursday, October 8, 2009
here is the link for the candle testing format
http://docs.google.com/fileview?id=0B4UrsYvq07VQZDBkMDJhMjctOTEwNC00NTQwLWE1YzAtMWZlYmI4Nzk1YzJh&hl=en
Wednesday, September 30, 2009
new friend with great molds -This is a candle testing chart
I have just met a new friend from http://www.frenchhillcountry.com/. She makes the greatest molds. I have purchased molds from her to make my pie candles at http://www.soycandlemart.com/. She has sent me a cool chart and a quick guide that I use when I test out my candles and tarts. The link is in the following post.
Tuesday, September 8, 2009
new post for fall fragrances
I have been thinking about some new fall fragrances. I have decided on caramel apple and of course pumpkin!
Subscribe to:
Posts (Atom)